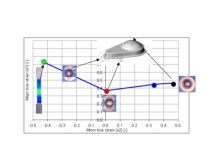
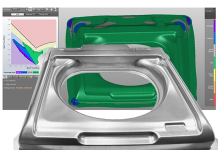
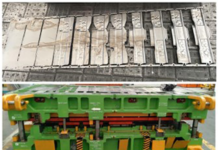
The blank is one of the first parameters defined in a stamping simulation; it’s mechanical properties, shape, and location in the tool. However, many engineers underestimate the impact that the assumed blank shape and location will have on the final production performance. In this post, we examine the impact of blank assumptions on the stamping production process.
 The blank shape, size, and location are key inputs of the stamping system
Blank assumptions
Blank size, shape, and location seem a simple input for simulation: Define a curve in space, mesh the interior, assign properties, and then run. But the blank assumed, during engineering, can create major disturbances downstream if those assumptions do not match production intent.
Often, the tooling process and blank shape might not be selected at the time advanced feasibility begins, and the process engineer will need to define something simple to get started. The blank used during advanced feasibility and Draw-OP engineering can be derived from several sources—such as an expanded punch opening, minimum blank output from inverse one-step finite element analysis (FEA), or arbitrarily defined shapes.

Two possible blank options- trapezoid embedded minimum blank prediction, shaped blank with minimum material requirements
Based on the available information, either of these assumptions is plausible. Using either of them for feasibility analysis will result in differences in predictions, potentially triggering different design decisions. Also, the manufacturing source might specify an entirely different blank shape. Many boundary conditions drive the blank shape definition, e.g., material utilization or tool cost targets.
It can be easily observed, if engineers check, that blank shape has great influence on the forming results; small blank size and shape adjustments can often move a process from feasible to a failure. However, once a blank shape and location from engineering is considered sufficient to release, the design engineers might stop checking for blank variations and the resulting quality. Whether or not the engineered blank will be usable in the stamping environment can be easily overlooked. More often than we like, the “safe” process from engineering can still prove problematic when the tool reaches production. While it is easier just to blame material or engineering when real world result differs from the engineering expectations, we should consider whether production conditions match the engineered assumptions.
Blank:
- Shape
- Size
- Location
Blank shape, sheared vs. shaped

Additional material outside the corner draw, restricts material flow. A blank shape that follow the geometry flows more freely
In the figure above, two possible blanks are shown for the same part and process (a B-pillar): one trapezoidal sheared blank and a shaped blank created using a blanking die. Sheared blanks are commonly applied by stampers since a sheared blank does not require a specific blanking tool to make the blank shape, thus lowering total die costs. However, a shaped blank that follows dieface shape and parameters, like the punch opening line, is a very common initial assumption during advanced feasibility. The trapezoidal blank shown below, with the additional material in the area of the front door opening, creates additional restriction to metal flow. The shaped blank follows the punch opening more closely, easing restraint and letting material flow into the corner for improved formability.
Blank Size
Changes in blank size from engineering to production, or sometimes from production lot to production lot, impact the ability of material to flow into corners and over radii (?). When the blank is larger than expected, material flows less effectively into corners and has greater binder contact (bearing), increasing the restraint from binder force and fiction. When the blank is smaller than expected, material could flow too easily into corners, reducing the anticipated desirable stretching in the die; the blank would also have less surface area, and therefore the effects of binder pressure will be different than expected. Also, the blank may slide through a draw bead prior to reaching bottom, completely changing the stretching in the part.

If the blank is smaller than expected, binder bearing and bead contact can be uneven from side to side, changing the effective stretch in the part
If it is larger than expected, the blank might not fit inside the blank locating system. When this happens, production lines might stop due to “part not present” faults, or blank edges could be damaged through contact with the blank locators. If this happens during production, automation engineers and die makers might move the blank location to accept the larger blank. But locators might not be moved to their original position when the normal or smaller blanks return, resulting in poor positioning of the blank inside the die.
Blank location in the die
In simulations, the blank always starts exactly where the engineer places it at the beginning of the analysis. But in production tooling, the blanks are located by robots or other automation. Blank location is controlled in production using gauges.

blanks are loaded into position, locating controlled by metal gauges. Image courtesy of kam-stampingguru.blogspot.com
In tryout and production, location of the blanks will always be less precise than in the simulation. Gauge location is often adjusted to accommodate ease of automation loading and unloading. With fluctuation in blank size and shape, any discrepancies in blank location only magnify. Sheared blanks rely on the coil edge for two sides of the blank, during normal production coil widths tend to vary by a few millimeters per side with every shipment. Any variation in coil width will change the blank size and affect the location of the blank. Sheared blanks rely on coil pitch as the remaining sizing element. Pitch can change from run-to-run if the coil feed mechanism varies in its setup or is showing wear. If the blank size varies, so does the location.
Tryout and production conditions and engineering intent
Prior to engaging in die tryout or home-line production, the engineering intent and the manufacturing conditions need to be validated. Any change in the blank parameters from the engineering assumptions to the as-built or as-run tool will certainly yield quantifiable differences. Tuning a die in tryout to run well for production conditions, that are far off from the design intent, will certainly change the performance of the stamping operation significantly.


Very interesting insight. I believe in professionals so this is a very useful article for everyone. Thank you very much for sharing..